
Knitted scarves are beautiful and soft, but a crocheter wants to crochet! Crochet is faster than knitting, and is great for producing nice chunky stitches. But too often, crochet scarves turn out awkward and stiff, lacking the nice drape and softness of knit. Determined to make a warm, soft, beautiful crochet scarf, I set out on my quest to find the perfect way to crochet a scarf.
I experimented with a lot of stitches to find one that would look nice (on both sides of the piece, because who wants a one-sided scarf?), would feel nice (not too dense, and with soft and smooth stitches), and that would work up quickly.
What I finally settled on is this beautiful ribbed variation of a half double crochet stitch. I love the look and feel of scarves made using this stitch.
Here’s how it’s done:
Start with a row of half double crochet (hdc).

The following rows will all be worked in the ribbed hdc variation. The only difference between a normal hdc and the ribbed variation is with where you insert your hook. Hdc stitches create an extra horizontal loop below the ‘V’ where you would normally insert your hook. To create hdc ribbing, you will insert the hook through that extra loop instead of through the V.
Some pictures to help:
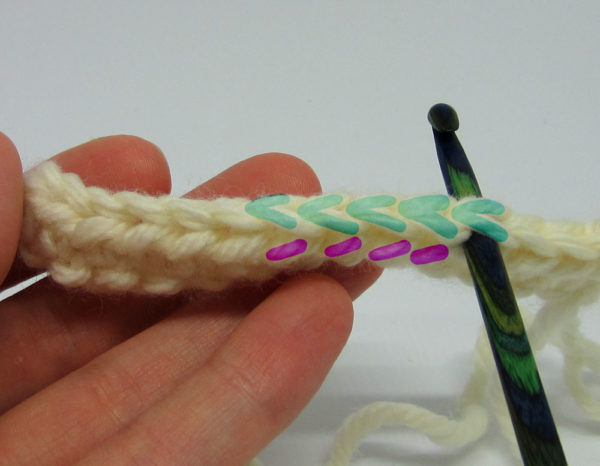
The image below shows the hook inserted through the V, like a normal hdc. This is not how you will complete this stitch.
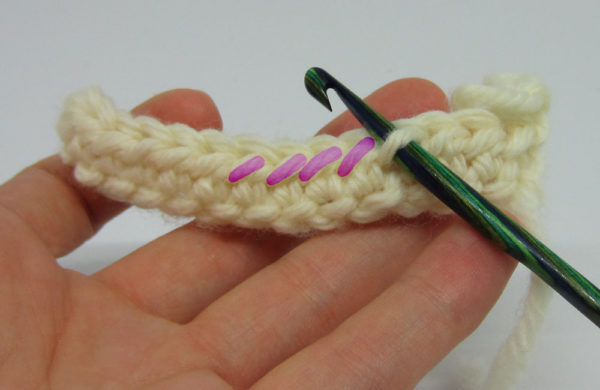
The next image shows the hook inserted in the horizontal loop. Continue hdc through these horizontal loops, and you will create the ribbing, it’s that easy!
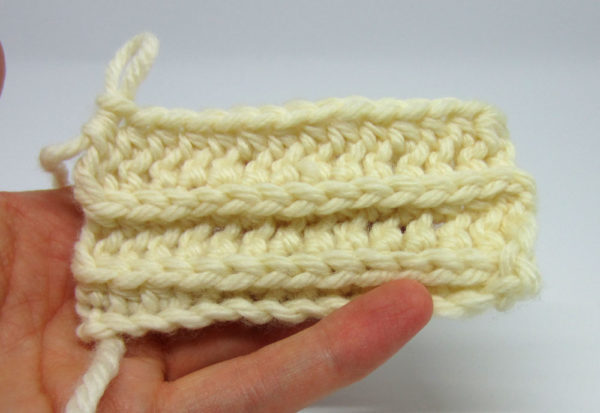
You won’t really start to see the ribbing effect until after a few rows, and it tends to look strange on a short piece (like the swatch below). So don’t give up on it too soon! It really is a simple and beautiful stitch, especially for a scarf.
Making the Scarf
Once you have the hang of the ribbed half double crochet stitch, making a scarf is a lot of fun. The scarf is worked up lengthwise, so the length of the starting chain determines the length of your scarf, and the number of rows determines the scarf’s width. I’ll walk you through how to figure out how long your starting chain should be.
**If you don’t want to calculate and don’t care about the exact length of your scarf, just make a chain wide enough that you can hold it in both hands and stretch your arms wide. Then, add 10-20 more stitches, and start crocheting your scarf!
Yarn
You can use any size yarn, but I recommend not using special fuzzy yarns because they will hide the ribbing – this stitch looks best with a standard yarn. I’ve used cotton, wool, acrylic, and more, and all have worked well, just not fuzzy yarns.
Hook
I recommend a hook that is a size smaller than you would typically use with your yarn – the ribbing turns out best when the stitches aren’t too loose.
First step: Crochet a swatch
The best way to calculate how many stitches you will need is to start by crocheting a swatch. To create a swatch, chain 15 stitches. Complete 5 rows of the half double crochet ribbed stitch.
Measure the 10 stitches in the middle of the swatch and write this measurement down. You will use it to calculate the number of stitches needed to complete the scarf.
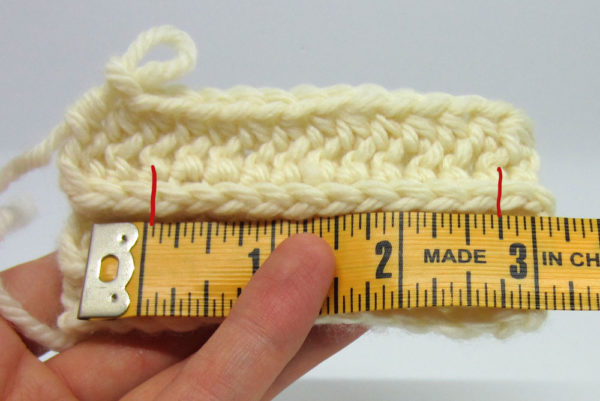
The swatch I created measures about 2.75 in. for each 10 stitches.
Determine the length of the chain
Now we need to use our swatch measurement to determine how many chains to make to get the desired scarf length. Between 6-8 feet (183-244 cm) is usually a good length. I’ll shoot for 6 feet for this example. First, I’ll convert that to inches. There are 12 inches in a foot, so my 6 foot scarf will be 72 inches.
So how many 10-stitch segments does it take to reach 72 inches? Here’s a simple formula:
Scarf Length / Swatch Measurement = X
Plugging in my numbers I get:
72 in. / 2.75 in. = approx. 26
So I will need 26 10-stitch segments to complete the scarf. In other words, I will need 260 stitches.
The width
Just keep adding rows until you like the width of your scarf. Not sure what width a scarf should be? Between 5 – 7 inches (12-18 cm) is usually a good standard size.
And you’re done! No finishing off needed.
I love using this stitch for scarves, but it’s also beautiful for blankets. I’m sure there are other applications as well, play around with it and let me know what you come up with! Also, if anything is unclear, feel free to ask for some help or clarification. Thanks for reading 🙂
Thank you 🙂
I have not touched a crochet hook or yarn in over 20 years….
This stitch is pretty easy and fun, so it’s a great project to get you back into crochet. Let me know if you try it!
Thanks so much, I sure will let you know. I really would love to not do the full length because my dogs will be driving me nuts lol….think you could do this stitch across not in length?
You could, but then the ribbing will go the opposite direction, and the ribbing probably won’t look as nice. Definitely doesn’t hurt to try. And it would definitely work, I just prefer to go along the length of the scarf, I like how that looks and feels. Although honestly, I’ve never tried this particular stitch the other way.. so I’d be curious to see how it turns out if you try!
this is lovely. How many skeins were used ?
2 100 gram skeins of bulky yarn is just about right for a 6 ft long scarf. So if you like an extra long and/or extra thick scarf, you’ll probably need 250-300 grams.
How do you get the two colors I see in your pictures on your blog? I see the one you made with red and navy yarn. It looks like more red on one side and more blue on the other. I am just getting back into crocheting and not sure how to do it. Thanks. I’m going to try it out in one color first then thought I would tackle the two colors.
Hi Karen, I’m not sure which two colors you are talking about. The two scarves pictured in this particular post are solid colored. Hmm, maybe you are asking another commenter about their own blog where they made this scarf? Well in any case, you can switch colors after every row for pretty stripes. If you alternate two colors, then it would appear as you described, more of one color visible on one side, and more of the other color visible on the other side. Hope that helps 🙂
hey,
when I’m doing the half-double crochet it swerves and ends up getting twisted and ugly. do you have any tips for keeping it straight? ((picture here, I am not good at explaining: ))
))
Hmm, the picture is blurry so I can’t tell what’s going on. But try crocheting a small sample, maybe 15-20 stitches across, and crochet a few rows of the half double crochet. That might help. Are you sure you are doing the half double crochet correctly? Maybe look for a youtube tutorial for the stitch to make sure you’re doing it right.
Thank you so much for this! I am using a larger hook because I wanted something a bit looser, but I am planning to make one more tightly crochet for a friend of mine.
A quick question: am I to understand that the base row for this would be a very long one, the entire length of the scarf? So, this is not a scarf crocheted in short rows but across long rows, yes? I’m basing this on a Ravelry forum.
Thanks!
I’ll probably have more questions, but this looks lovely.
Okay, whoops, never mind – just looked at your response to another similar question!
Thanks for sharing this pattern – my first ever crochet project finished! I crocheted the two loose ends together and made it an infinity scarf I can wear looped twice or three times around my neck and I love it! 🙂
Many thanks for the pattern, just finished a scarf and its lovely. Would never have thought of this stitch.
I know this post is old but I’d like to know if there’s a safe way of switching colors with this. I’m currently using this to make my boyfriend a blanket and i’m using a medium yarn (size 4?) with a bigger hook then recommended (they want 5.5mm i’m using a 9.0mm) so it’s big and fluffy. But i don’t want it to start coming apart because i didn’t switch colors correctly. (and i wouldn’t want to just knot the two colors together. Anyway love the pattern! It’s really fluffy!!
Switch colors at the end of the row. Leave fairly long tails (maybe 6 inches), and crochet right over them. This way, you don’t have to knot the strands, and they will be worked into the blanket so that they don’t come loose.
If you want to use the tails as part of a fringe, then don’t crochet over them. Just leave them loose, and they will become part of your fringe when the blanket is finished. It still won’t come loose, even with no knots. This is how I do my multicolor scarves. If it’s going in the washer/dryer, then they might come loose, I’m not sure.. but otherwise, it’ll be completely secure.
Also, feel free to knot the tails if it’ll make you feel better. As long as you change colors at the end of the row, the knots will also be at the end of the row, and this probably won’t be noticeable, unless you change colors a lot.
I guess you’ll have to experiment a bit to see what works. The most important thing is to leave extra long tails. Having really short tails is what will cause the blanket to unravel. And if the tail is too short, you’re stuck, there’s nothing you can do about it.
Hope that helps.
This is SO easy! I love it!!!!!
This scarf is perfect. I’m making several using up yarn for the Maslow Project. A program for homeless people. I use a K hook and chain 155 stitches and then turn and in second chain from End hdc across ending row with c 1 turn repeating until I have the width scarf I want. 12-14 rows. Fast and beautiful with no need to finish the ends. Thank you so much for this wonderful gift.
Wonderful pattern! My first attempt turned out nicely. Thanks, also for the information on blocking, it will make a huge difference. 🙂 Thanks for posted such a lovely and easy pattern, I’ve had a lot of fun with it.
Cool, I finally figured it out! Gonna have to make something with this. In the middle of a scarf made with ordinary HDC right now. Gotta come up with an excuse to use this on something. 🙂
[…] pattern and instruction for the stitch came from the following patterns, arctic summer cowl & crochet ribbed scarf. I’ve scoured YouTube for a good video of this stitch and haven’t had any luck. […]
My very first project. Just blocking the scarf now. Some sections are cuvier than others and my edges are uneven in length, but I’m thrilled with the stitch and how the scarf progressed all in all. I’ll definitely be giving this one a second try… 🙂
The perfect scarf pattern. Goes fast and is soft and pretty. Was so happy I found this pattern. I am using it to use up leftover yarn and donate to The Maslow Project next winter.
AMAZING! Can’t wait to try!
me gusta esta puntada pero no la entiendo, por favor pongan un vedeo. Gracias.
Wow! This is just awesome! I would have never, ever in a million years figured this out. Thanks so much for sharing. 🙂
[…] pattern and instruction for the stitch came from the following patterns, arctic summer cowl & crochet ribbed scarf. I’ve scoured YouTube for a good video of this stitch and haven’t had any luck. […]
Thanks so much. This is an awesome stitch. I used a thick yarn and a P needle and completed an infinity scarf in 2 days!!! Looking forward to making more of them!!!!!!
I love this stitch! I used an Alpaca yarn and it made up very quickly. The scarf is just beautiful! I’m sure I’ll be using this stitch again. Thanks for the tutorial.
Great Pattern!
Crocheting a scarf is also a good way to relieve stress.
This stitch is genius! I made several scarves & caps for snowmen made from fence post spindles. They are SO cute & look like knitted caps, but it takes 1 evening to complete. Thanks so much – would never have thought of it. Now I think I’ll make a throw.
I have never crocheted anything apart from edgings before. This scarf was a milestone for me. I followed the instructions carefully and it came out lovely. I’m just about to start another one and will definitely do many more. Thanks for the pattern.