
Knitted scarves are beautiful and soft, but a crocheter wants to crochet! Crochet is faster than knitting, and is great for producing nice chunky stitches. But too often, crochet scarves turn out awkward and stiff, lacking the nice drape and softness of knit. Determined to make a warm, soft, beautiful crochet scarf, I set out on my quest to find the perfect way to crochet a scarf.
I experimented with a lot of stitches to find one that would look nice (on both sides of the piece, because who wants a one-sided scarf?), would feel nice (not too dense, and with soft and smooth stitches), and that would work up quickly.
What I finally settled on is this beautiful ribbed variation of a half double crochet stitch. I love the look and feel of scarves made using this stitch.
Here’s how it’s done:
Start with a row of half double crochet (hdc).

The following rows will all be worked in the ribbed hdc variation. The only difference between a normal hdc and the ribbed variation is with where you insert your hook. Hdc stitches create an extra horizontal loop below the ‘V’ where you would normally insert your hook. To create hdc ribbing, you will insert the hook through that extra loop instead of through the V.
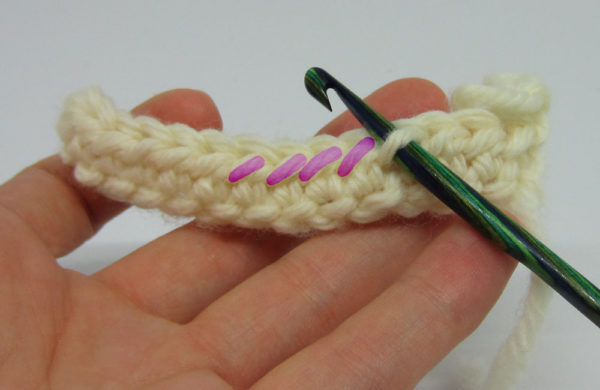
Some pictures to help:
The image below shows the hook inserted through the V, like a normal hdc. This is not how you will complete this stitch.
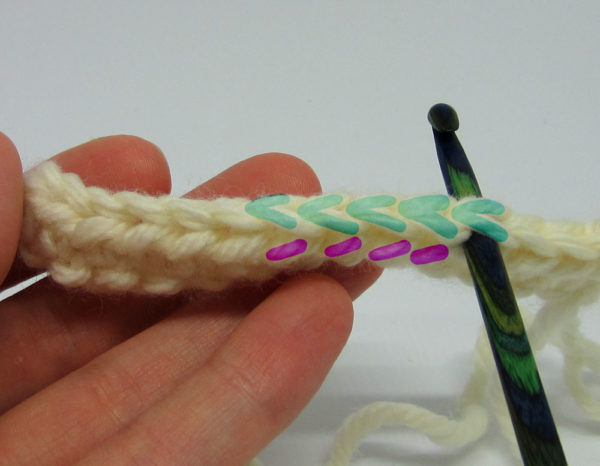
The next image shows the hook inserted in the horizontal loop. Continue hdc through these horizontal loops, and you will create the ribbing, it’s that easy!
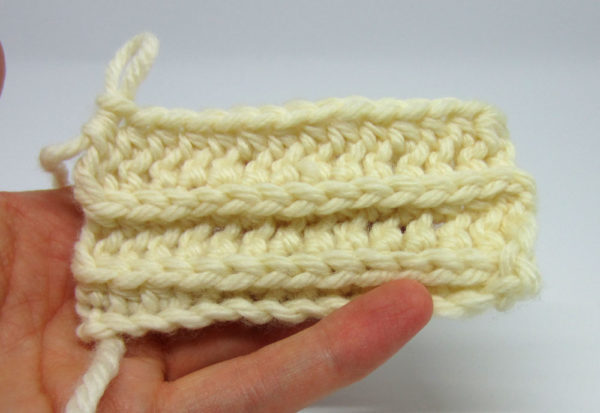
You won’t really start to see the ribbing effect until after a few rows, and it tends to look strange on a short piece (like the swatch below). So don’t give up on it too soon! It really is a simple and beautiful stitch, especially for a scarf.
Making the Scarf
Once you have the hang of the ribbed half double crochet stitch, making a scarf is a lot of fun. The scarf is worked up lengthwise, so the length of the starting chain determines the length of your scarf, and the number of rows determines the scarf’s width. I’ll walk you through how to figure out how long your starting chain should be.
**If you don’t want to calculate and don’t care about the exact length of your scarf, just make a chain wide enough that you can hold it in both hands and stretch your arms wide. Then, add 10-20 more stitches, and start crocheting your scarf!
Yarn
You can use any size yarn, but I recommend not using special fuzzy yarns because they will hide the ribbing – this stitch looks best with a standard yarn. I’ve used cotton, wool, acrylic, and more, and all have worked well, just not fuzzy yarns.
Hook
I recommend a hook that is a size smaller than you would typically use with your yarn – the ribbing turns out best when the stitches aren’t too loose.
First step: Crochet a swatch
The best way to calculate how many stitches you will need is to start by crocheting a swatch. To create a swatch, chain 15 stitches. Complete 5 rows of the half double crochet ribbed stitch.
Measure the 10 stitches in the middle of the swatch and write this measurement down. You will use it to calculate the number of stitches needed to complete the scarf.
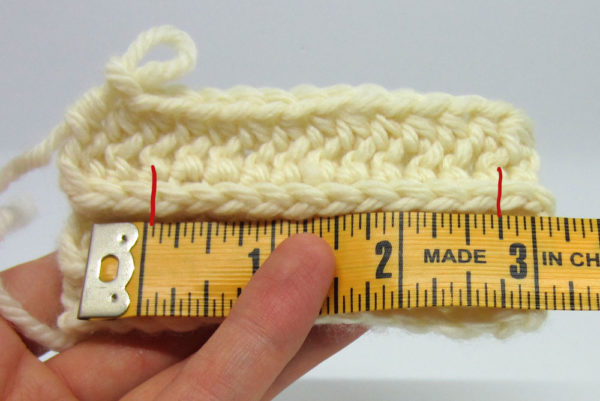
The swatch I created measures about 2.75 in. for each 10 stitches.
Determine the length of the chain
Now we need to use our swatch measurement to determine how many chains to make to get the desired scarf length. Between 6-8 feet (183-244 cm) is usually a good length. I’ll shoot for 6 feet for this example. First, I’ll convert that to inches. There are 12 inches in a foot, so my 6 foot scarf will be 72 inches.
So how many 10-stitch segments does it take to reach 72 inches? Here’s a simple formula:
Scarf Length / Swatch Measurement = X
Plugging in my numbers I get:
72 in. / 2.75 in. = approx. 26
So I will need 26 10-stitch segments to complete the scarf. In other words, I will need 260 stitches.
The width
Just keep adding rows until you like the width of your scarf. Not sure what width a scarf should be? Between 5 – 7 inches (12-18 cm) is usually a good standard size.
And you’re done! No finishing off needed.
I love using this stitch for scarves, but it’s also beautiful for blankets. I’m sure there are other applications as well, play around with it and let me know what you come up with! Also, if anything is unclear, feel free to ask for some help or clarification. Thanks for reading 🙂
I absolutely love this scarf! I was looking for something quick and simple to make for my younger girls and this was perfect! I made 2 for them on Sunday, and I’m about to make 2 more (for me and hubby)! Thanks a bunch for posting this!!!
Hi Jenn,
I love this scarf & would like to make it very long in order to be able to tie it in a very large floppy bow at the neck, as seen on Pinterest. Do you think that this pattern is soft & flexible enough to do that?
Thanks, Gillian
I think you could do that, I guess the only way to find out is to try 🙂 The type of yarn you use and the size hook really makes a difference, so test out the stitch first to see if its how you like it. And if you use any sort of wool, remember that soaking the piece and laying it out to dry will make it soooooooo much more soft and flexible when you’re done.
Jenn, thank you for your inspiration! I am off to make an infinity scarf (by joining my chain and working in the round) with your stitch. 🙂 brill thanks again
Oh my goodness!!!! I love this. Can I use this stitch to make scarves to sell?
Most certainly. This scarf is made of a single stitch which I have no rights over, so you can do whatever you want with it 🙂
I start my first row 3rd ch from hook and end each row in the last remaining stitch (the edge stitch) it will be a normal hdc
I’ve done a lot of knitting and also some crocheting, but I simply cannot start this project correctly. The edge looks ugly and I always end up losing stitches. After multiple failed attempts I made up my own starting method. I use the continental cast on to cast on a knitting needle. Then I crochet the stitches off of the knitting needle using the hdc. You need to cast on one extra stitch as you will lose one stitch on the first row. This gives a very nice even edge, but it can be too tight if you are not careful.
What do you mean by use a smaller hook than you normally would? DO you mean smaller than indicated on the package of yarn? Thank you!
Hi Crystal, yes, a hook smaller than the one on the label should work. Experiment first though before making your whole scarf, crochet a small square to see how you like it. Small as in a washcloth size, I mentioned that to another commenter, you can keep your sample square as a washcloth after so it doesn’t feel like a waste of time 🙂
I appreciate the photos and explanation, but where is the Pattern Instructions.
No official pattern at this time, just a tutorial for the stitch.
Hello, love the pattern, made one scarf already and just about to start the second! Having a hand made Christmas this year so this has come in handy. Took me a while to get it right but this is only my second attempt at crochet! Thanks so much.
Victoria.
hi i want to start on this for a friend how many yarns did u use and whats the hook size. i looooove it,
Hi Joice, I used approx. 200 grams of bulky yarn for the scarf pictured, and I’m not sure what size hook. But I’ve made this scarf using all different sized yarns, it really doesn’t matter. And the amount of yarn completely depends on how long and wide you want the scarf to be. I’d say 250 grams for a 6 foot long scarf of an average width. When choosing your hook, just use a smaller hook than you normally would, it looks better with this stitch (in my opinion anyway). And make sure to experiment a little before actually beginning your scarf. Crochet a washcloth-sized square to see how you like it. And you can use it as a washcloth when you’re done 🙂
Any tips for using different colors to make this scarf? Inserting either horizontal or vertical stripes? I’m excited to try this pattern; so far all my crocheted scarves have been very dense. I’m hoping this will be a bit more flexible and thus more comfortable around the neck
I love to make striped scarves using this stitch by changing the color after each row. Use the tail from each color as part of your fringe instead of trying to weave the ends in.
I both love this scarf and the fact that you replied to so many questions! You are awesome.
– thanks from a beginning crochet-er 😉
I have been doing cowls in the hdc in blo, and was looking for something different for some charity scarves I’m doing next (red scarves for college kids still in the foster care system). I found that chaining 210 in Red Heart Super Saver (forgot the hook…maybe an H) gave me a nice, long scarf. Also, crocheting my first row of hdc in the back “bump” of the chain made the beginning edge of the scarf very even, uniform, tidy, and pretty!
Jenn
I read all the comments and I hope one day you have time to upload a video of this stitch in YouTube.
Thanks for the pattern 🙂
I just learned to crochet last year. I learned to make hats first, & I make about 60 hats from several patterns.
So, this year I’m working on making scarves, just love this pattern.
The only trouble I’m having is that the scarf seems to curve every time.
Any pointers on what I’m doing wrong?
Hmm, the only thing I can think of is that you might be skipping stitches at the end of each row. Maybe practice this stitch with a small swatch around 15 stitches across, to make sure its flat and straight before making an entire scarf. Not fun to make swatches, but it’s better than making an entire scarf only to realize something’s wrong with it—which is something I’ve done and continue to do far too many times…
Hi Deb, Wow! 60 hats! I’m only on my third crochet project ever. However, my second one was a ribbed scarf–that curved. That is, it bent toward one side, sort of curling as I went. For me, the problem was two-fold: first, the pattern said to make the initial chain loose. Thought I did, but not enough! Second, my stitches got looser as I relaxed and got into a flow. The tighter weave at the beginning caused the bending/curving effect. It had a certain charm and evened out as the piece grew heavier (I used two threads at once in contrasting colors, so it had some weight to it). I hope that provides a data point for you.
Thank you for this pattern and the tutorial, I love it and have made several blogged here :-
http://lindacraftycorner.blogspot.co.uk/2012/09/crochet-or-knit.html
The genius is always simple!!! I’m glad I found your blog /accidentally/. Your presentation is written very well and I didn’t have to read it once again. Thank you! 🙂
I’m made this scarf for my nieces husband and now I’m making one for my great nephew but I would like to work a button hole in it so it won’t fall off. What type of button hole Horizontal or Vertical would work with this pattern?
Hmm, well I’ve never tried a button hole with this stitch (actually I’ve hardly ever done button holes at all) but I would think if you did a vertical button hole on the scarf by chaining and skipping stitches, that would work pretty well. Example, chain 3, skip next 3 stitches. Then on the next round, once you reach the chain, you’d half double crochet into the chain stitches, and continue across the scarf, and you’d have a nice buttonhole where you chained 3.
Thank you! I only have three stitches in my repertoire so this is a nice change from my usual treble scarves. Very easy to understand.
I made this scarf just by following your directions and it came out beautiful. So good in fact, I made another for a charity event. Thank you so much for posting the pattern with such explicit and easy to read directions.
I am a beginner, so I would need exact directions, how many rows, what needle, etc. Do you have exact directions??????
No, I don’t have an actual pattern right now. But it really just depends on your preference and experimentation. Play around with different yarns and needles and see how you like it. And make it whatever length you want to—some people like thick or long scarves, some people like skinny or short scarves.
Hi Jenn, Thank you for this great idea. It looks like just what I need.
For us beginners, could you at least tell us what type of yarn and hook you used for the one in your photo? That might help us gauge where to start with our experimentation.
Also, I’m STILL having trouble knowing where to insert the hook despite your nicely color-coded example photo. I made a scarf that seems similar to this (my second project ever!) that used half double crochet inserted into what they called “the back” of the top row of stitching. (The back of the little row of Vs). The normal place is in the hole below both of the sides of the V.
I’m not quite sure what “below” means in your scarf. Compared to that little line of Vs at the top, where do you insert the hook? I’ll experiment, but any other tips are appreciated!
I am a beginner, so I would need exact directions, how many rows, what needle, etc. Do you have exact directiona??????
Wow!! I came across your website tonite through Operation Gratitude Scarves for Our Troops. This is an excellent variation to crochet HDC scarves . . . Love it!! Thank you so much for sharing this & will try this out with my next HDC scarf I make.
Thanks so much for this pattern! I have a friend who wanted me to make her a circle/infinity scarf. I did one but she wanted a tighter stitch (fewer holes) that the pattern I used. I came across these directions last night and gave it a try. When I finished the scarf I slip stitched the ends together and it makes a great circular scarf that she likes. 🙂
So that we crocheters don’t keep propagating the myth that crochet is stiff here’s a tip that’s applicable to basically any crochet stitch: if you want more drape take the recommended hook size and size up. That’s it. So many patterns ignore this fact, and it’s such an easy fix. Swatch it out first to figure which hook size will give you your intended finished product and work that. Voila!
Yes switching up the hook size does give more drape, but many crochet stitches just don’t have the smoothness and drape that knit does nonetheless. I also prefer stitches that aren’t too loose because I like a neat and tidy look—that’s why I love this particular stitch, it’s very smooth and has great drape, and looks and feels great when it’s not done loosely.