
Knitted scarves are beautiful and soft, but a crocheter wants to crochet! Crochet is faster than knitting, and is great for producing nice chunky stitches. But too often, crochet scarves turn out awkward and stiff, lacking the nice drape and softness of knit. Determined to make a warm, soft, beautiful crochet scarf, I set out on my quest to find the perfect way to crochet a scarf.
I experimented with a lot of stitches to find one that would look nice (on both sides of the piece, because who wants a one-sided scarf?), would feel nice (not too dense, and with soft and smooth stitches), and that would work up quickly.
What I finally settled on is this beautiful ribbed variation of a half double crochet stitch. I love the look and feel of scarves made using this stitch.
Here’s how it’s done:
Start with a row of half double crochet (hdc).

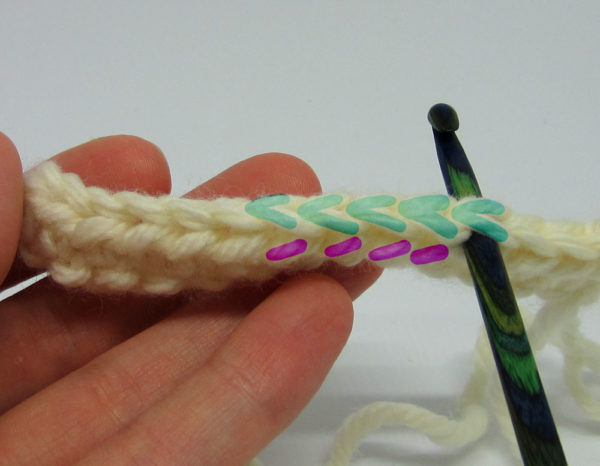
The following rows will all be worked in the ribbed hdc variation. The only difference between a normal hdc and the ribbed variation is with where you insert your hook. Hdc stitches create an extra horizontal loop below the ‘V’ where you would normally insert your hook. To create hdc ribbing, you will insert the hook through that extra loop instead of through the V.
Some pictures to help:
The image below shows the hook inserted through the V, like a normal hdc. This is not how you will complete this stitch.
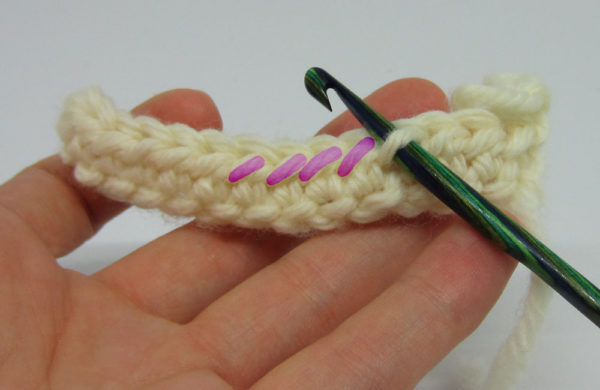
The next image shows the hook inserted in the horizontal loop. Continue hdc through these horizontal loops, and you will create the ribbing, it’s that easy!
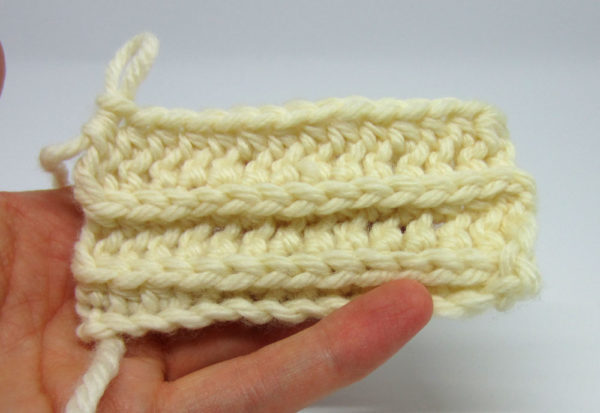
You won’t really start to see the ribbing effect until after a few rows, and it tends to look strange on a short piece (like the swatch below). So don’t give up on it too soon! It really is a simple and beautiful stitch, especially for a scarf.
Making the Scarf
Once you have the hang of the ribbed half double crochet stitch, making a scarf is a lot of fun. The scarf is worked up lengthwise, so the length of the starting chain determines the length of your scarf, and the number of rows determines the scarf’s width. I’ll walk you through how to figure out how long your starting chain should be.
**If you don’t want to calculate and don’t care about the exact length of your scarf, just make a chain wide enough that you can hold it in both hands and stretch your arms wide. Then, add 10-20 more stitches, and start crocheting your scarf!
Yarn
You can use any size yarn, but I recommend not using special fuzzy yarns because they will hide the ribbing – this stitch looks best with a standard yarn. I’ve used cotton, wool, acrylic, and more, and all have worked well, just not fuzzy yarns.
Hook
I recommend a hook that is a size smaller than you would typically use with your yarn – the ribbing turns out best when the stitches aren’t too loose.
First step: Crochet a swatch
The best way to calculate how many stitches you will need is to start by crocheting a swatch. To create a swatch, chain 15 stitches. Complete 5 rows of the half double crochet ribbed stitch.
Measure the 10 stitches in the middle of the swatch and write this measurement down. You will use it to calculate the number of stitches needed to complete the scarf.
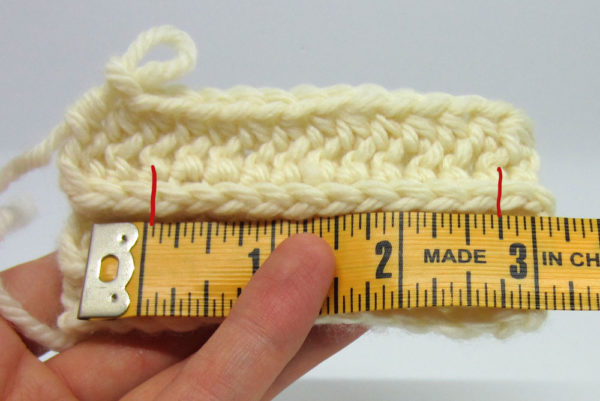
The swatch I created measures about 2.75 in. for each 10 stitches.
Determine the length of the chain
Now we need to use our swatch measurement to determine how many chains to make to get the desired scarf length. Between 6-8 feet (183-244 cm) is usually a good length. I’ll shoot for 6 feet for this example. First, I’ll convert that to inches. There are 12 inches in a foot, so my 6 foot scarf will be 72 inches.
So how many 10-stitch segments does it take to reach 72 inches? Here’s a simple formula:
Scarf Length / Swatch Measurement = X
Plugging in my numbers I get:
72 in. / 2.75 in. = approx. 26
So I will need 26 10-stitch segments to complete the scarf. In other words, I will need 260 stitches.
The width
Just keep adding rows until you like the width of your scarf. Not sure what width a scarf should be? Between 5 – 7 inches (12-18 cm) is usually a good standard size.
And you’re done! No finishing off needed.
I love using this stitch for scarves, but it’s also beautiful for blankets. I’m sure there are other applications as well, play around with it and let me know what you come up with! Also, if anything is unclear, feel free to ask for some help or clarification. Thanks for reading 🙂
I would like the pattern for this beautiful scarf please
Love this stitch…thank you! I used this stitch/pattern to make a keyhole scarf for my husband. It turned out beauitfully. Now I’m using this same ribbed stitch to crochet a vest for myself. Thank you!
Great articles you post on your blog, i have shared this article on my facebook
Could you use this stitch for a blanket? Obviously just making the scarf but a lot wider? Thanks.
[…] softer than most crochet scarves and it looks really interesting because of the ribbing. I used Jenn Ozkan‘s Crochet Ribbed Scarf – it’s not quite a pattern because it’s just so […]
Here’s how I did my scarf, based on this pattern. 🙂 Hope it helps and makes sense to y’all. Since I’m a newbie, this is about as simple as it gets. Lol
Step 1: Chain 225 + 2 more for the turning chain. In 3rd ch from hook, hdc, & then hdc in each ch across. (This should end up being about 5 ft long. If you want a longer scarf, chain until desired length).
Step 2: Ch 2 for turning ch and hdc in stitch below the gap where you normally insert the hook. Do this all the way across.
Repeat step 2 until scarf is desired width.
Thank you, Kayla.
How many skeins did you use?
What size hook ?
I made a scarf of similar color for a craft ministry at my parents’ church. The pattern, once you get the hang of it, is very simple, even for a beginner crocheter like me. 🙂 Thanks for the beautiful scarf pattern! Mine is a similar shade of red as the pic posted here. Oh, I did have trouble keeping the ends even, but still looks good, nonetheless. 😉
Not very good instructions! But a nice scarf!
can I get the pattern for the ribbed scarf. Yours scarf is beautiful. thanks
Hi I have been following your instructions on crocheting this scarf. However, my scarf turns out that the ribbing v part of the scarf keep turning downwards instead of facing upwards like in your photos. Do you know if I am doing something wrong? Please help. Thank you!
Thanks for stitch:)
This pattern is exactly what I was looking for but I’m a little confused. Do I make a chain as long as I want my scarf, then start with the half crochet? Then crohet how-ever-many rows until it is the width I want??
Thanks!
Joan, that’s what I honk after reading her instructions a few times. Its a beautiful scarf but, for real beginners, a little short on instructions! Very grateful for her sharing it, however.
Think! Not honk (darn auto correct).
That’s exactly what I did for my scarf, Joan. Worked out beautifully. 🙂
how do I print this, right now I don’t have a computer.
[…] of a cowl on my poncho, I picked up all 80 stitches that I had started with, using sc’s. A ribbed look was what I was after, so I turned my work after every round of 80 sc’s and of course […]
My scarf tends to curl around itself instead of lying flat any suggestions. I love the pattern and how quickly it goes.
Try checking your guage, my work often curled as a beginner and it was usually because my guage had changed. I started checking my guage frequently until my stitches became more consistent.
Is there a pattern to follow or you just showing how to do the stitch and I come up with my own pattern. I haven’t been doing this very long. I really like this scarf after searching the web for hours !
I just mastered how to do the foundation HDC and searched for HDC patterns, this pattern is perfect, thank you so much for sharing it. The foundation HDC gave me the first Row and it looks great. THANKS again for the pattern and pictures of how to make the ribbed look.
Jenn: love this pattern, I have made several swatches up to figure it out. Please tell me do you hdc through the end chain ? Mine does not look as your end does. This has the look of ribbing but not huge stretch correct?
Seems to be just what I was looking for.
Do you have an actual pattern…number of stitches, amount,of yarn, etc.?
Do you have the actual pattern, how many stitches to start etc.
[…] […]
[…] http://jennozkan.com/2010/12/crochet-ribbed-scarf-its-like-knitting-only-better/ […]
How much yarn does it take to make this? Thank you for sharing!!!!!
Oh, also… I used less than two “balls” of Caron Simply Soft Yarn, which is 6 oz./170 g, or 315 yds each. I was starting with a partially used “ball” and then had to start a new one because I ran out of the other. Could only take one ball, or one and a little more, depending on the length and width of yarn. I used an I/9 – 5.50 hook.
I’m wondering how to start this. I’ve made one already but I came back to this site to remind myself what to do after I’ve chained 5 feet. The second row, what do you do? I know from that point on, but the second row is blocked from my memory for some reason. Thanks in advance!
I crocheted a 5 ft chain, then I hdc into the 2nd chain from the hook, and all the way to the end. After I added 1 chain loop, and then turned. I began to now Hdc into the area that’s been told for the pattern. I continue to do this until my desired width. At the end/last row, I add regular hdc all the way across. I end my piece, and weave in all my ends. I added tassels/6 of them equally at the ends to finish it. The scarf came out beautifully. Thank you to the pattern sharer. I just love sharing patterns and working patterns out.
Thanks a million for instructions
Wow!! Just what I was looking for. I am going to give this a try today. Thank you so!!! much. 🙂
Thank you, I’ve recntly been searching for information approximately this subject for ages and yours is the greatest I’ve came upon till now.
However, what in regards to the bottom line? Are you sure about thhe source?
Here iis mmy blog; IC Strategy