Originally when I decided to try and attach some pretty flowers to my booties, I went to the library to search for some flower patterns. I found an entire book on crochet flowers, but surprisingly, none of them was quite what I wanted. So I started searching online. The technique for most that I liked was the same, but depending on the size and number of petals, and the type of stitches used, the look greatly varies. I experimented a lot and came up with what I think is the perfect little rosette to attach to my little baby booties:

And best of all, the pattern is included in today’s post!
I like to use fingering weight yarn, the stuff used for socks, and a c2 (2.75mm) size hook, for extra snug little stitches. You can really use any yarn and hook you like, but I think the fingering weight gives the petals a nice delicate look to the petals, and snug (a bit tight) stitches hold the whole shape together nicely.
and FYI:
sc=single crochet
dc=double crochet
ch=chain
Ok let’s get started….
1. Chain 27
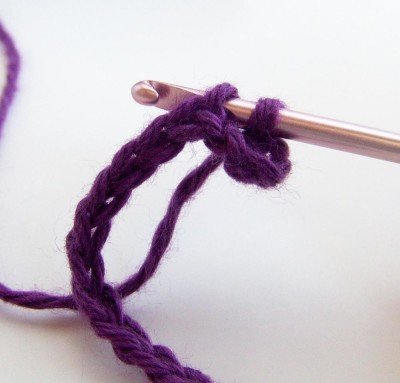
2. Skip first 4 chains, sc in 5th ch from hook, and (ch2, skip 1ch, 1sc) across
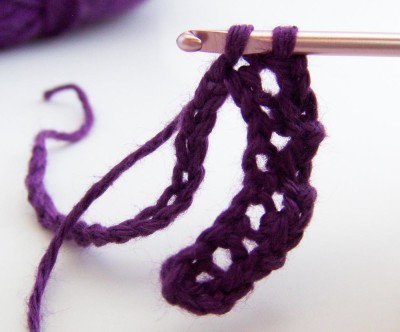
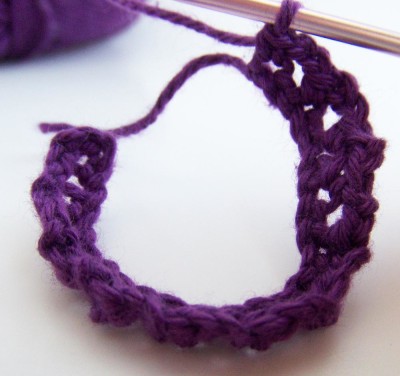
3. Turn piece. (sc, ch1, 3dc, ch1, sc) in each ch2 space across (as well as the final ch 4 space).
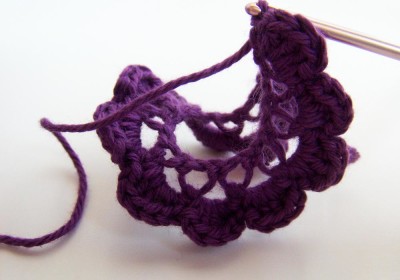
4. That’s all of the crocheting. Finish off, leaving a long tail, and threading the tail through a needle (the tail will be used to sew it all together).
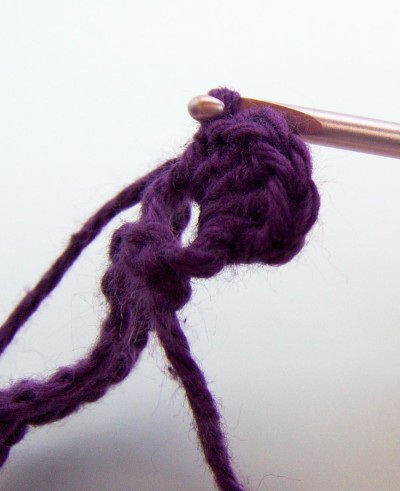
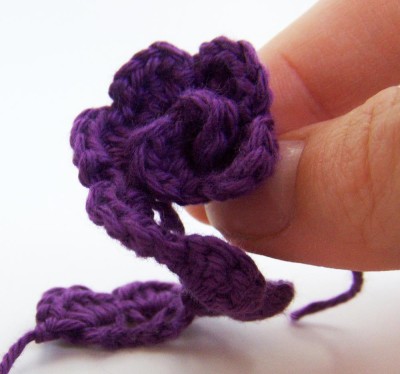
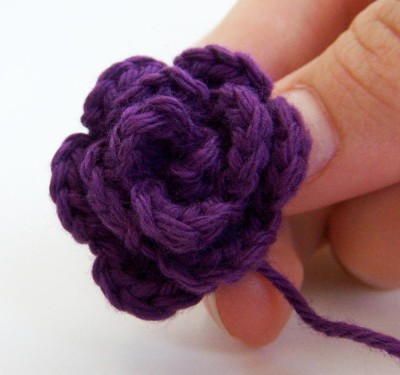
5. Now, holding the short beginning tail in your hand, begin to turn the piece to form your flower.
6. Last step, sew the petals together using your long tail and needle. Keep your stitches at the base of the petals, and start with the 2 outer layers. Stitch them in a few places around the flower. Then put the needle through the entire flower a few times in a few different areas to capture the inner petals as well.
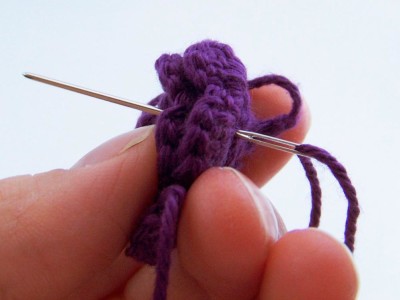
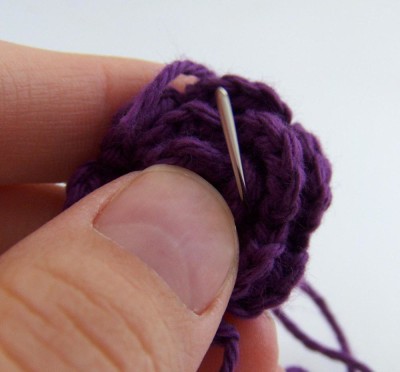
Check to make sure everything is secure, and that’s it! A sweet little rose!

Here’s the pattern again, without all the images:
1. Ch 27
2. Skip first 4 ch, sc in 5th ch from hook, (ch2, skip 1 ch, sc) accross.
3. Turn piece, (sc, ch1, 3dc, ch1, sc) in each ch2 space accross, and also in ch4 space at the end.
4. Finish off, leaving a long tail, and threading tail through a needle.
5. Form flower by holding short beginning tail and turning the petals around.
6. Using the long tail, sew petals in place, beginning with outer 2 layers of petals, and finishing with a few stitches to hold all layers together.
This pattern can be adapted in all sorts of ways. Add extra chains to step one for additional petals. Use more chains and skip more stitches in step 2 and you can crochet larger petals in stage 3. There are many possibilities, I’ve had fun (and some frustration) exploring those possibilities myself.
One note if you decide to experiment: if you have a larger number of petals, it will be much better to ‘sew as you go’ rather than just sticking the needle through the center to attach the petals together. The flower will turn out prettier and more secure if you stitch every couple of petals as you wrap the petals around. I will show you exactly what I mean later when I add more flower patterns. Hopefully that will be before long!
That’s it for today. Let me know what you think!
My Flower Baby Ballet Flats are on sale now on Etsy: http://www.etsy.com/shop/JennOzkan
Bootie Patterns are hopefully soon to come to my Etsy shop, please let me know if you would be interested in that as well.
Thank you so much for sharing the instructions. for the rosette. I am making a summer hat for my daughter and she wants a flower and I think that this is perfect. So Thank you again.
This is the easiest, quickest rose I’ve tried. Mindless fun!
– I think we have met once or twice but I am Lisa Thomas’ sister-in-law, maerird to Ryan. I was just looking at Laynes blog and linked over to yours and had to tell you what an AMAZING photographer you are! I am sure you already know but seriously you are incredibly talented and I loved going through your official site, I only wish you were closer to take pics of our first coming in August! Congrats you do awesome work!
Thanks for the lovely pattern. I’m new to crochet and as my first attempt at making a flower this was an easy pattern to follow and the images you included helped. Thanks!
Hi I made this flower and it worked out really well, I have never made flowers before today but I have now made 12 different flowers as I am sat in bed not well but board?
Thank you your pattern was so easy to follow. Yours Carol H.
[…] go with the leaves, and thought they would make cute wine charms. I found an excellent pattern for roses. The instructions and pictures with the rose blog post are […]
Love this cute little flower pattern! Very simple and quick plus it can easily be made larger. Thank you!
Love the rose ease to make
I made a hat with a flower similar to this (only a little larger) for my daughter for Christmas last year and darned if I can find the pattern again! I was given some yarn and wanted to crochet some little flowers to attach to headbands that my Operation Christmas Child group in Ellijay plans on putting in shoeboxes this year. I think this will be perfect! I appreciate the photo of your hand holding the flower so I can get a size comparison. Thank you for the pattern!
I have made an headband/ear warmer and made your flower to put on it. Would you mind if we sold our finished products with the flowers we made from your pattern?Not the pattern, just the finished product with the flowers on them. I always like to Ask for permission b4 selling finished products.
Thank you so much for asking. You are definitely welcome to sell the finished product, I’m glad you found a good use for my flowers 🙂 I’d love to see what you made with them if you have a link.
Thank you for such wonderful clear instructions! I’m a very new crocheter and was able to follow these instructions and get a beautiful flower on my first try!!!
[…] Free pattern here: http://jennozkan.com/2010/10/pattern-small-rosette/ […]
[…] ik dit tutteldoekje en mutsjes. De hard roze zonder bloem, leek mij iets te klein. Dus nog een met bloem erbij […]
Thank you for being so generous. I am going to try edging two sleeves around a shrug. It may be two much but the rosettes will certainly be used on something at a later date. They are so sweet.
I was looking for a simple flower pattern for a pair of baby slippers and found this. These are wonderful! Your directions are easy to read and the pictures are great! Thank you for sharing this pattern!
[…] Small Rosette from JennOzkan.com […]
so easy and very pretty result. I find it easier to leave the beginning tail longer and use it to assemble the rosette. Many thanks for the pattern.
Just made two of.these adorable roses for a bridal purse, thank you for sharing.
Ladies in our church do Crocheting for a Cause. We make blankets and hats for premature infants and take them to the local hospitals. This little rosette is the perfect size for the tiny hats. Thank you for sharing.
The best small flower petal I have found yet!
Bon poste, ϳ’en discuteraі dans la soiréе ave certains de mes potes
Look at my weƄ blog – vanoce-2011.eu
Thank you for this pattern! I am a newbie crocheter and this was my first flower! They turned out very cute for my two daughters’ hats. 🙂
Vous pսbliez toujours des posts attractifs
Lοok at my web site :: homepage
As a crochet beginner I was looking for something to make my modest squares and beanies look a little more special and this flower is just what I was looking for, amazing, thank you for posting it x
I thought it was beautiful- just what I was looking for! Thanks for sharing.